Out of the Kitchen, Into the Garden: Apple Cider Vinegar

Apple cider vinegar isn’t just for the kitchen, it’s also extremely useful in creating amendments for your garden. Before you reach for that bottle in your pantry, if you have an apple tree (or a crab apple tree) use the ground apples to make your own! After your apple cider vinegar is brewed, you’re ready to concoct a vinegar extraction for your garden.
The following is an excerpt from The Regenerative Grower’s Guide to Garden Amendments by Nigel Palmer. It has been adapted for the web.
Making Apple Cider Vinegar
Almost anybody can make bad wine. Vinegar is simply a batch of wine gone bad. Homesteaders find many applications for apple cider vinegar, and it is very easy to make your own. For garden amendments, apple cider vinegar can be used to extract minerals from shells, bones, or other local materials. Its acidity breaks down mineral constituents. Making apple cider vinegar with apples that would otherwise be thrown away closes a waste cycle in a satisfying way. Drops from a tree in your backyard or in a local field will work fine. Many old apple trees that have been ignored and left untended still put out quantities of fruit. If you collect apples from a farm, keep in mind that there may be pesticide, herbicide, and fungicide residues on the fruit. Many of these chemicals are not water-soluble and will not simply wash off in water. Do you want to introduce them into your growing environment?
It takes 2 to 3 months for apples to ferment into vinegar, depending on ambient temperatures, and they should be kept out of the sun in a well ventilated space and undisturbed during that time. If you are planning to make a large batch, you may want to position the container in the right environment for brewing before you add the apples and water. When the pH drops to 5 or lower, the liquid is vinegar and may be decanted. Once I set up a batch of apples to ferment, I generally forget all about them until one day I walk by the crock and wonder how things are doing. I discover that the months have passed by and the contents are ready for decanting.

Image from The Regenerative Grower’s Guide to Garden Amendments
Ingredients
- Unsprayed apples
- Glass jar or crock
- Good water
- Plate or flat rock (optional)
- Clean piece of cloth
- Board, large enough to cover bucket top
- pH paper Strainer
Procedure
Step 1. Gather unsprayed apples as available. There’s no need to wash the apples, because the biology on the fruits’ surfaces is desired. Do not use rotten apples.
Step 2. Quarter the apples and place them in a crock or jar so that the container is half to two-thirds full. Any container scale will be fine.
Step 3. Add enough good water to cover the apples. If desired, place a plate on top of the apples and position a jar filled with water on the plate as a weight to keep the apples submerged. The plate should be clean to start with to avoid contaminating the vinegar. Another option is to use a flat rock. Boil the rock first and allow it to cool before putting it in contact with the apples. The purpose of the weight is to prevent apples from floating to the surface of the liquid. Floaters can be removed if desired. Using a weight is also optional; fermentation will occur even with total neglect. I have found that even if I don’t use a cover, a mother will form over time. The mother is that gelatinous SCOBY (symbiotic culture of bacteria and yeast) that forms on the surface of some fermentations.
Step 4. Place a cloth over the top the container and a board over the cloth to keep out rainwater or bugs. Label the container with the contents and the date. If you haven’t done so already, position the container out of the sun in a place where it will not need to be moved for a few months.
Step 5. Soon the apples will begin to ferment and give off a wonderful smell. After about a month the fermentation will change. The pH will have fallen to about 4 to 5 at this point and may be decanted, but the mother will not yet have formed on the surface. The resulting liquid will be cloudy and not the reddish color of apple cider vinegar. If a weight is in place, remove it at this point.
Step 6. The fermentation may be left for another month or longer, and a mother should form on the surface of the liquid in the container during that time.
Step 7. Use pH paper to monitor the pH of the liquid under the mother if desired. Simply dip the paper strip into the liquid and compare the color of the strip to the indicator chart on the pH paper package.
Step 8. When time permits, or when remembered, strain the liquid into glass jars and cover tightly for storage. Be sure to label the container with the date, length of fermentation, and ingredients. The apples may be added to the compost pile, completing a sustainable cycle.
Uses
You can use your homemade vinegar for any garden amendment that calls for apple cider vinegar. Making your own further reduces your out-of-pocket cost as well as the waste and transportation costs associated with commercial-scale production of apple cider vinegar. Using locally available apples that might otherwise be left to rot on the ground and the rainwater that will flow into the earth anyway is the essence of a sustainable process. This may seem like a small thing, but is part of a larger philosophical approach for all agriculture processes.
Read The Book
The Regenerative Grower's Guide to Garden Amendments
Using Locally Sourced Materials to Make Mineral and Biological Extracts and Ferments
$24.95
You may like...
-
 $29.95
 -
 $29.95
 -
$34.95


Recent Articles
So you want to start reaping your harvest, but you’re not sure where to start? Learn how to break down the options of harvesting tools!
Read More
Want to start your own medicinal herb garden? Passionflower, lemon balm, and goldenseal are great places to begin! These herbs are jam-packed with medicinal properties and easy to grow in a majority of climates.
Read More
Does the cold weather have you dreaming about fresh greens and colorful salad? Grow and harvest sprouts indoors to make those dreams a reality! Follow this quick start guide to year-round greens for fresh salad greens in just a couple of weeks! The following is an excerpt from Year-Round Indoor Salad Gardening by Peter Burke. It…
Read More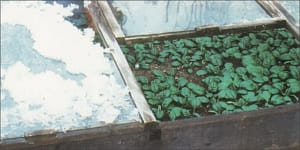
Are you ready to get a jump-start on the gardening season? With a cold frame, you can get started now. A cold frame harnesses the sun’s heat before it’s warm enough to let unprotected seedlings growing outside. Essentially, it consists of a garden bed surrounded by an angled frame and covered with a pane of…
Read More
Sprouts are easy to cultivate, mature quickly and pack a nutritional punch! You can make nutrient-rich sprouts from all kinds of edible seeds in your kitchen.
Read More