Start Your Own Medicinal Herb Garden with These 3 Herbs

Want to start your own medicinal herb garden? Passionflower, lemon balm, and goldenseal are great places to begin!
These herbs are not only jam-packed with medicinal properties; they’re also extremely easy to grow in a majority of climates. With a little background information on the proper growing conditions, medicinal uses, and harvesting and drying tips, you’ll be all set to herbs in no time!
Unless otherwise noted, all photos by Jeff and Melanie Carpenter.
The following are excerpts from The Organic Medicinal Herb Farmer, Revised Edition by Jeff and Melanie Carpenter. They have been adapted for the web.
Passionflower: A Floral Addition to Your Medicinal Herb Garden
Passionflower Plant Description
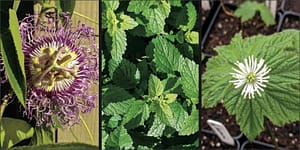
Passionflower is an herbaceous vine that becomes woody as it matures and is hardy to USDA zones 5 to 10. It is native to the southern and eastern United States, and it is possible to overwinter passionflower in zone 4 if it is heavily mulched and planted in a protected location. The flowers bloom in late summer and are purple and white, growing up to two to three inches in diameter.
The flower is a complex layer of riotous symmetry and design. The base of the passionflower is composed of two layers of finely fringed sepals and petals. In Vermont, passionflower vines can grow ten to fifteen feet tall. Growers in warmer climates may have plants reaching twenty feet or more.
Growing Conditions
Despite its exotic looks passionflower is relatively low maintenance and easy to cultivate. It can grow in weak, sandy soil but responds well to fertile, well-drained areas and likes to grow in full sun. Because it is a vining perennial, it requires some sort of trellising system and should be planted in a location where it can climb.
Propagation
Passionflower can be grown from seeds, vegetative cuttings, or layering. When seeding passionflower, sow seeds in regular potting medium (which can be amended with sand if desired) and keep moist. Passionflower can be somewhat sporadic in its germination, so don’t throw in the towel too quickly. It can sometimes take many weeks for plants to emerge.
To propagate from cuttings take six- to eight-inch cuttings from the stems, plant cuttings three to four inches deep in a light potting mix, and water well. Keep in a warm, sunny environment, and let the plants fully root before transplanting out. Another way to vegetatively propagate is through layering, done by bending the vines onto their sides, removing the leaves, and covering the bare stems with soil.
It’s best to leave six to twelve inches of the top part of the plant exposed. Water the layered stems in well, then let the layering develop for a few months. The buried stems will begin to form roots from the leaf nodes. Once a solid set of roots is produced, sections of the stems can be divided from the parent plant into individual new plants and used for transplanting.
 Planting Considerations
As previously mentioned, passionflower is a climber and requires a trellis of some sort, either naturally occurring or man-made. It can be trained to grow against the side of a building, on wooden trellises, fence posts, or the like.
If you are creating a permaculture design, consider planting passionflower on the south-facing side of large trees (such as sugar maple, black locust, and slippery elm) to help ensure that the plant gets enough light and is not shaded out.
Medicinal Uses
Passionflower is a wonderful nervine for calming the body, easing nervous tension, and helping people sleep. It has sedative qualities without leaving the body feeling sluggish or drugged.
It has the ability to ease anxiety and reduce wired energy in both children and adults. Clinically, it has been shown to help treat panic attacks when taken over long periods of time. It is simultaneously relaxing and uplifting.
Passionflower also has antispasmodic qualities and can help to reduce pain. It can be taken alone or in formulation with other nervines and makes pleasant-tasting teas and extracts. The flower essence of passionflower is also beneficial to restore a sense of wonder and hope. Passiflora produces delicious fruit, commonly known as maypop or passionfruit. Plants can produce anywhere from five to twenty fruits per mature vine.
Harvest Specifications
Both the leaves and flowers are used medicinally. The aerial parts of the plant are harvested when the plant is in full bloom; in Vermont it flowers in early to mid-August. To harvest, cut the vines down to about a foot above the ground, leaving a few leaves to help the plant regenerate in subsequent seasons. Vines are easily cut with a sharp field knife or pruner and can be transported on clean tarps.
Postharvest and Drying Considerations
Dry the vines intact on drying racks with good airflow and minimal light. This helps maintain the vibrancy of the blossoms, which can easily degrade in direct light. Dry at temperatures of 100 to 110°F. In optimum conditions passionflower will dry in three to four days. Once they are dry strip leaves and flowers off the vine and run the leaves and flowers over quarter-inch stainless steel mesh. Leaves and flowers are commonly sold together.
Lemon Balm: “Mint” to Be In Your Medicinal Herb Garden
Plant Description
Lemon balm is an herbaceous perennial hardy to USDA zones 4 to 9. Lemon balm is native to the Mediterranean and Eurasia and is a lovely mint, belonging to the Lamiaceae family. It has square stems and opposite leaves that are slightly heart shaped and toothed.
They grow two to three inches long and are very fragrant and lemony tasting. The flowers of lemon balm grow in whorls around the stem and are composed of small white blossoms. The plants are upright and branching, growing three to three and a half feet tall.
Growing Conditions
Lemon balm grows well in full sun to partial shade. Many herbalists report growing large plants well in the shade, but we like to grow lemon balm in full sun because the plants seem much more vibrant and medicinally potent, with higher concentrations of essential oil.
Regardless of whether the plant grows in full or partial sun, it needs good, fertile but not excessively fertile, well-drained, loamy soil, with ample soil moisture. Lemon balm can grow in one spot for many seasons and may be banded with compost or manure in early spring. We find that after three to four seasons our lemon balm stands get tired from multiple harvests, so we plant new beds in different locations.
Propagation
Lemon balm is easily propagated from seeds and vegetative cuttings. Sow seeds indirectly in early spring for transplants. The seeds are light-dependent germinators and should be planted on the surface, covered lightly with potting medium. Some growers scarify the hard seed coats of lemon balm seed but we have had good germination results without scarifying our seed.
To make softwood cuttings take slips from new green growing tips, strip off the lower leaves, and plant in moist potting mixture. Keep cuttings moist and warm. They are usually ready to transplant into the fields in three to five weeks.
Planting Considerations
Lemon balm is an easy-to-grow, highly medicinal, and extremely yummy member of the mint family. It can grow well in lots of different soils and is a very generous plant, giving multiple harvests in one season. We often grow our lemon balm stands for at least three years in one location. Recommended plant spacing is twelve inches within the rows and twenty-eight inches between rows, with two rows per bed. Lemon balm grows fast when it becomes established and will form a dense hedge that will help to outcompete weeds.
When growing lemon balm, it can be a good idea to mulch. This helps plants overwinter in colder climates and also decreases soil splash that can not only make the leaves dirty but can also introduce foliar diseases and leaf spots. Other things to consider when planting lemon balm are that it is a favorite of bees and is antimicrobial and antiseptic. This makes it an excellent choice to plant around beehives. The lemony smell has also been known to repel many types of harmful insects and can act as a protective border or companion plant.
Medicinal Uses
Lemon balm is a very special member of the mint family. It has nervine properties that can reduce nervous tension, relieve agitation, and help the body relax. It is also very uplifting and soothing to the spirit. Lemon balm is highly aromatic and pleasant tasting and is a favorite for teas, tinctures, and cordials.
Besides being totally delightful, lemon balm has antiviral and antimicrobial properties and is a good source of vitamin C. It is often used in healing protocols to treat cold sores and fever blisters and to fight infection. Underneath its wonderful lemony taste, lemon balm also has slightly bitter attributes and is antispasmodic, making it an excellent carminative and treatment for gastric upset.
Harvest Specifications
It is best to harvest lemon balm when the plant begins to bloom. This is when the volatile oils and medicinal attributes are at their peak. Harvest during hot, dry weather when the plants are clean and vibrant. To harvest use a field knife or sickle bar cutter to cut the entire aerial part of the plants down, leaving six to eight inches of green growth on the plant to regenerate. In a good season it is possible to get two to three harvests from lemon balm. Lemon balm tends to heat up quickly in the field and should be processed immediately after harvest to maintain high quality.
Postharvest Considerations
Lemon balm can be tricky to dry because it can easily degrade and lose important chemical constituents. For this reason some herbal resources recommend using only fresh lemon balm, stating that the dried plant is not as medicinal. While this may be true for a lot of the mass-marketed lemon balm, we find that dried lemon balm can be exceptionally healing if it has been processed carefully.
The key to maintaining quality is to dry lemon balm at lower temperatures with good airflow and minimal exposure to light. Airflow and lower drying temperatures are essential to minimizing the volatilization of key essential oils. It also prevents lemon balm from turning brown. We harvest lemon balm in the morning after the dew has dried and rack it in the drying shed before it gets too hot.
Drying Lemon Balm
It is a good idea to place lemon balm on drying racks in a single layer to maximize airflow and prevent composting. We keep the drying shed sides rolled up and the fans on and put lemon balm on our lower racks, which tend to be cooler than the ones at the top of the shed. Gradually, as the plants start to lose their moisture and begin to dry, we close up the shed and allow temperatures to increase to no more than 95°F.
By monitoring closely, our goal is to dry lemon balm in two to three days. As soon as the leaves lose their pliability and start to get crunchy, but before the stems are completely brittle, we remove the lemon balm from the shed and garble it by running the plants over quarter-to half-inch stainless steel mesh. This breaks the dried leaves off the stem and produces a desirable grade of herb.
Giving Your Medicinal Herb Garden the Seal Of Approval: Goldenseal
Plant Description

It grows six to twelve inches tall and has a single stem that produces two palmate leaves composed of five to seven large lobes. Leaves can be five to eight inches wide and are deep green. Flowering in early summer, goldenseal blossoms are diminutive but lovely.
They grow out from between the leaves about two inches above the foliage and are greenish-white with little rays of stamens circling a central point. The berries by comparison are bright red and resemble the shape and size of a plump raspberry.
The roots are also vivid and full of energy. They grow horizontally and are bright yellow and bumpy. Goldenseal roots, on average, are one-half to three-quarters of an inch thick, with many rootlets branching off the main rhizome.
Growing Conditions
This woodland plant likes to grow in the understory of hardwood forests that have approximately 70 to 75 percent shade, are rich with humusy soils composed of leaf mulch, and are well drained but with good moisture content. Growers either utilize hardwood forests to create woodland beds (wild simulated) or grow goldenseal in shade houses.
Unlike ginseng, goldenseal tends to fare better in shade houses and is less susceptible to diseases. That said, we grow goldenseal using wild-simulated techniques in the woods. It has less expense associated with it and requires fewer resources than building and maintaining shade houses. The end product is beautiful and highly medicinal roots.
Propagation
Goldenseal can be grown from seed or rootlets. On our farm we plant rootlets one to two inches deep with the small nascent buds (the buds located at the apex where stem growth originates) oriented up. Goldenseal needs cold winter dormancy, so it is recommended to plant rootlets in the fall or very early spring before they begin to break dormancy at about one-foot spacing.
Planting Considerations
Goldenseal beds in the woods are prepared in a manner similar to that of ginseng beds. When laying out the beds, we find it helpful to make them one or two arms’ lengths wide to allow us to reach in easily from either side to plant, weed, and harvest without having to walk in them. Goldenseal often forms into an intertwined mat of rootlets once established, and it is good to minimize disruption and foot traffic.
Before planting, rake away surface leaf matter and top dress with soil amendments if needed based on soil test results. Goldenseal does well in soils that have a pH of 5.5 to 6.5.1 After planting be sure to restore leaf mulch; this will help retain moisture and add nutrients to the soil as leaves decompose. Avoid using straw to mulch, as it can inadvertently introduce fungal diseases. It is important that the rootlets do not dry out and should be irrigated as needed.
Habitat loss from mountaintop-removal mining and overharvesting from the wild are two main factors putting this beautiful woodland plant at risk of disappearing in its natural environment. It is currently on the United Plant Savers’ “At-Risk List”2 and is a plant that farmers should consider cultivating. It is relatively easy to grow in the understories of hardwood forests or in shade houses. Like its woodland friend ginseng, goldenseal does well when companion-planted with other species such as trillium, wild ginger, and Solomon’s seal.
Medicinal Uses

Goldenseal can be used internally in moderation or topically and helps the body rid itself of foreign bodies and infection.
Typically it is recommended to use goldenseal at the onset of illness and discontinue use after two to three weeks.
Prolonged use of this strong medicine can be contraindicated and irritating to the system. Goldenseal is also a wonderful bitter and excellent at stimulating sluggish digestion. It can be used alone or bitters, mouthwashes, and topical liniments.
Harvest Specifications
Goldenseal roots can be harvested after three years and are easily dug with a spading fork. The leaves are also medicinal and can be harvested every season. It is best to harvest both the roots and the leaves of goldenseal after fruit has matured to allow the plant to set seed. These seeds can be harvested and replanted to help repopulate stands.
Postharvest and Drying Considerations
Goldenseal is easily washed with a hose or barrel root washer. Because the roots are small, there is no need to chop them before washing. Soil can get tangled in the small rootlet hairs, so it is helpful to pull root mats apart to ensure proper cleaning. Do not overwash or soak the roots, as this can leach important medicinal compounds from them.
After washing, dry on racks with good airflow at temperatures of 100 to 110°F. Mill roots after they are fully dried. Goldenseal roots dry under optimum conditions in three to four days.
Like other aerial plant parts, leaves can be dried on racks as well and should be spread out in a single layer with access to good airflow. Goldenseal leaves will dry in approximately two days and can be garbled by running the leaves and stems over half-inch stainless steel mesh.
Notes
- Christopher Hobbs, “Ginkgo: Ancient Medicine, Modern Medicine,” Christopher Hobbs’s website, www.christopherhobbs.com/website /library/articles/article_files/ginkgo_01.html.
- Richo Cech, Growing At-Risk Medicinal Herbs: Cultivation, Conservation, and Ecology.
Recommended Reads
Recent Articles
So you want to start reaping your harvest, but you’re not sure where to start? Learn how to break down the options of harvesting tools!
Read MoreWant to start your own medicinal herb garden? Passionflower, lemon balm, and goldenseal are great places to begin! These herbs are jam-packed with medicinal properties and easy to grow in a majority of climates.
Read MoreDoes the cold weather have you dreaming about fresh greens and colorful salad? Grow and harvest sprouts indoors to make those dreams a reality! Follow this quick start guide to year-round greens for fresh salad greens in just a couple of weeks! The following is an excerpt from Year-Round Indoor Salad Gardening by Peter Burke. It…
Read MoreAre you ready to get a jump-start on the gardening season? With a cold frame, you can get started now. A cold frame harnesses the sun’s heat before it’s warm enough to let unprotected seedlings growing outside. Essentially, it consists of a garden bed surrounded by an angled frame and covered with a pane of…
Read More


