Sap Moon Recipes for Sweet Treats

This time of year we always seem to get a hint of spring in the air for a moment, whether it’s the snow storms starting to taper off or a glimpse of grass in your yard. The lure of sweetness calls from the maple trees and we begin daydreaming about all of the wonderous treats we can create from the abundance of sap as it starts to flow.
The following is an excerpt from Full Moon Feast by Jessica Prentice. It has been adapted for the web.
Following the Hunger Moon, just before the first thaw after the cold winter, comes the Sap Moon. Though snow and ice still cover the ground throughout the North, the very first movements of spring stir within the forest trees. The sap of renewed life begins to rise up through the trunks, making its slow and steady way to the outermost tips of the branches where it will nurture the buds that will become new leaves.
While all northern trees produce sap at this time of year, the sugar maple in particular inspired the naming of the Sap Moon. Maple sap runs from the first sign of thaw until the first buds appear on the trees—a period of four to six weeks, depending on the weather. During this phase of the year, in times past, the northern dwellers of the eastern part of this continent would begin to check the maple trees for the sweet sap that was an important source of food.
When the sap was running it was time to head for your nearest grove of sugar maples, called a sugar bush, begin tapping the trees, collecting sap, and pouring it into large pots for sugaring. What a lovely thing to contemplate: people stirring huge cauldrons of boiling maple sap with a wooden spoon over a fire in the midst of a snowy wood. The fragrance of the sap as it evaporated slowly into thick, sweet syrup must have been intoxicating.
The first peoples to harvest maple sap were the indigenous peoples of the northern woodlands, where the sugar maple, Acer saccharum, is both native and prodigious. For many cultures—the Anishnabeg (or Ojibway or Chippewa), Abenaki, Mi’kmaq, Passamaquody, Penobscot, Potawatomi, and Iroquois, to name a few—tapping maple trees was an annual ritual. The sap is watery and clear; Native peoples drank it as a spring tonic beverage and used it to make vinegar.
European colonists often called it maple water. An Iroquois legend explains how the secret of maple sugaring was discovered. A chief named Woksis threw his tomahawk into a tree before leaving on a hunt. As the weather warmed, the sap began to flow from the gash into a container that happened to be sitting by the tree. The woman of the house found the container full of liquid, assumed her thoughtful husband had already been to the stream to fetch it full of water, and used it to boil the evening’s meat. As the meat stewed, the sap cooked down into syrup, and thus the secret of maple sugaring was revealed.
The Sap Moon was also often called the Sugar Moon. The process of reducing maple sap is called sugaring, and most indigenous peoples that relied on maple sap as a primary source of carbohydrate, flavor, and nutrition cooked the sap down past the syrup stage and into the sugar stage, at which point it crystallizes. Solid sugar was much easier to transport than liquid syrup, and was conveniently packaged in birch-bark containers often called mokuks, which held from twenty to thirty pounds each.
Maple Roasted Nuts
Makes 1 cup
Ingredients

1 cup walnuts or pecans
3 tablespoons maple syrup
Procedure
- Place the nuts in a colander and shake to remove any powdery bits that might burn.
- Transfer the nuts to a cast-iron skillet and toast over medium-high heat, stirring constantly with a wooden spoon, until they begin to change color and smell fragrant (just a few minutes).
- Pour the maple syrup over the nuts in the hot pan.
- Stir and shake for a minute until all the nuts are coated and the syrup has evaporated.
- Pour the nuts onto a wooden cutting board. Immediately fill the skillet with water and place it in the
sink. (This prevents the sugar from sticking to the pan and becoming hard to clean!) - Use a spatula or other tool to scrape and stir the nuts on the cutting board and keep them moving for a minute or so while they cool (otherwise they’ll stick to the cutting board).
- Transfer the nuts to a bowl and put the cutting board under hot water.
- Eat and enjoy as a snack, or serve with fruit, or put on a salad.
Hot Coco Cocoa
Serves 1–2
I make this hot cocoa at least once a week! Sometimes I like to froth it in my milk frother until it is foamy (do this between steps 4 and 5).
Ingredients

1/4 cup filtered water
1 tablespoon palm sugar
1 tablespoon cocoa powder, or to taste
1/4 teaspoon vanilla extract
1 1/2 cups raw whole milk
Few grains of sea salt
Procedure
- Heat the water in a small, heavy-bottomed saucepan over medium heat.
- Add the palm sugar and cocoa powder. Whisk vigorously as the mixture comes to a simmer until both sugar and cocoa are dissolved.
- Add the remaining ingredients.
- Heat gently until the cocoa feels hot to the touch, but not so hot that you can’t keep your finger there (about 110° F).
- Remove from heat and pour into warm cups or mugs.
After Dinner Mints
I have always loved mints with a chocolate coating. These healthful mints are delicious and easy and satisfy that craving. They can substitute for dessert. I think kids would love to help you roll them.
Ingredients

½ cup coconut spread or coconut butter
1 tablespoon palm sugar
1 tablespoon honey, preferably crystallized
1 tablespoon coconut oil
4–5 drops organic peppermint essential oil
Cocoa powder for dusting—1–2 tablespoons (you can substitute carob powder)
Procedure
- In a bain-marie or small heavy-bottomed pot, very gently warm together the coconut spread, palm sugar, honey, coconut oil, and peppermint oil.
- When all is warm and pliable, transfer the mixture to a food processor and process into a smooth paste, or transfer to a bowl and mix together thoroughly with a spoon.
- Transfer the paste to a bowl and cool completely. You can put the bowl in the fridge for 5 to 10 minutes.
- Place the cocoa powder in another small bowl.
- Roll the mints by taking about a half-teaspoon of paste and rolling it into a ball in the palm of your hands, then rolling each ball in the cocoa powder until coated, and transferring to a plate.
- Place the plate of balls in the fridge until firm, then transfer to a tin or airtight container and store in the fridge.
- To serve, you can allow the mints to come to room temperature or eat them cold, as they are.
Recommended Reads
Read The Book

Full Moon Feast
Food and the Hunger for Connection
$30
You may like...
-
 $30.00
 -
 $19.95
 -
 $40.00


Recent Articles
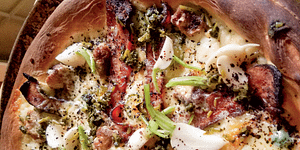
Nothing says “spring” like a fresh, foraged meal! Savor the flavors of the season with this Milkweed Bud Pizza recipe.
Read More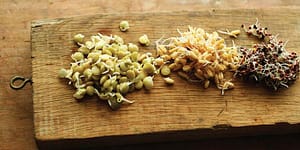
One simple and healthy way to breathe life back into your diet is by sprouting your own seeds. You can make nutrient-rich sprouts from all kinds of edible seeds right in your own kitchen. Sprouts are incredibly versatile too! You can make chickpea sprout hummus, salads, or in this case: energy bars! The following is…
Read More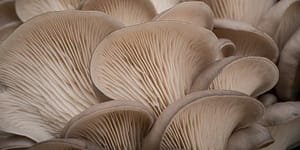
What’s so great about oyster mushrooms? First, you can add them to the list of foods that can be grown indoors! They are tasty, easy to grow, multiply fast, and they love a variety of substrates, making oyster mushrooms the premium choice. The following is an excerpt from Fresh Food from Small Spaces by R. J.…
Read More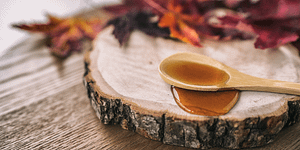
Maple is a special addition to any recipe and cozy way to enjoy the marvelous sweetness of maple. Perfect with coffee or tea and delicious everyday snacking!
Read More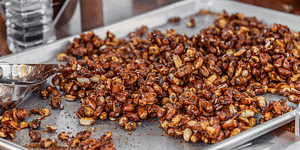
Craving something sweet? These delicious maple roasted nuts are the perfect treat to help you push through those end-of-winter blues. The following is an excerpt from Full Moon Feast by Jessica Prentice. It has been adapted for the web. The Magic of Maple: A Rich History Following the Hunger Moon, just before the first thaw…
Read More