Malt Your Own Grain at Home: Brewing from Scratch

Do you think making a 100%-from-scratch beer is near-to-impossible? We’re here to tell you, it’s not! With just a few ingredients and a little patience, you can malt your own grain at home and get started on a brewing a batch of beer completely from scratch!
The following excerpt is from Brew Beer Like a Yeti by Jereme Zimmerman. It has been adapted for the web.
(Photographs courtesy of Jereme Zimmerman unless otherwise noted.)
Malt Your Own Grain at Home
It’s quite simple to malt your own grain. All you need are whole, unhulled grains, water, and a bit of patience. Barley works best due to its high potential for enzyme conversion, but other grains such as sorghum or field corn (dried, not sweet and right off the cob) will work as well. I recommend starting with enough for a 1-gallon (4 L) batch of all-grain beer, as it will help you to understand the process before you try malting larger amounts. Once the grains are malted, you can follow my technique for 1-gallon all-grain brewing in chapter 8, and you’ll have the pleasure of being able to say that you made a batch of beer entirely from scratch! You can easily scale up from there. The whole process should take two to three days.
Ingredients and Equipment
- 2 pounds (1 kg) unhulled barley or other whole grain
- Around 1⁄2 gallon (2 L) warm springwater or dechlorinated tap water (enough to cover the grains)
- Widemouthed 1-gallon (4 L) or larger glass jar
- Cheesecloth or dish towel with a rubber band, or sprouting lid (basically a lid with a fine-mesh screen)
Procedure

- Fill the jar with grains up to about 2 inches (5 cm) below the opening, to allow room for them to swell. Cover the grains with the water and secure a sprouting lid, or use a rubber band to secure a cloth, over the jar’s opening.
- Let the grains soak in a warm area (60–70°F/15–21°C or higher) for 12 to 24 hours.
- Sometime between the 12- and 24-hour mark (wait longer in cooler temperatures), drain all water off, or the grains will ferment and eventually rot. To do this, let the jar sit upside down in a bowl or draining rack, making sure it is not resting in the drained water. The grains will only germinate if they’re moist but not covered by water, as they require both water and oxygen to sprout.
- Place the jar back in its warm area and proceed to rinse the grains two to three times (or more) a day; be sure to drain off all water each time. You want them to stay moist, but keep from molding.
- Watch for sprouts (tails) to start emerging from the seeds. Once the tails are about three-quarters the length of the seed, they are at peak fermentation viability. Use them within a day or store them for a couple of days in a refrigerator, as the enzymes and sugar will diminish quickly.
- If you plan on saving them for later, dry them in an oven at about 150°F (66°C) or in a dehydrator. Dry them until they are too hard to bite through when put between your teeth.
- If desired, roast the grains before storing (using the Roasting Your Own Malt guidelines on page 64).
- Store the grains in an airtight container in a cool place until you’re ready to use them.
Recommended Reads
Read The Book

Brew Beer Like a Yeti
Traditional Techniques and Recipes for Unconventional Ales, Gruits, and Other Ferments Using Minimal Hops
$24.95
You may like...
-
 $45.00
 -
 $29.95
 -
$29.95


Recent Articles
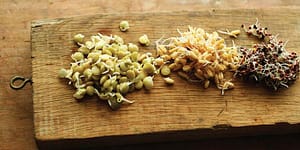
One simple and healthy way to breathe life back into your diet is by sprouting your own seeds. You can make nutrient-rich sprouts from all kinds of edible seeds right in your own kitchen. Sprouts are incredibly versatile too! You can make chickpea sprout hummus, salads, or in this case: energy bars! The following is…
Read More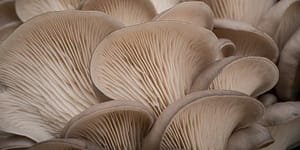
What’s so great about oyster mushrooms? First, you can add them to the list of foods that can be grown indoors! They are tasty, easy to grow, multiply fast, and they love a variety of substrates, making oyster mushrooms the premium choice. The following is an excerpt from Fresh Food from Small Spaces by R. J.…
Read More
Maple is a special addition to any recipe and cozy way to enjoy the marvelous sweetness of maple. Perfect with coffee or tea and delicious everyday snacking!
Read More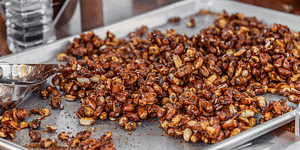
Craving something sweet? These delicious maple roasted nuts are the perfect treat to help you push through those end-of-winter blues. The following is an excerpt from Full Moon Feast by Jessica Prentice. It has been adapted for the web. The Magic of Maple: A Rich History Following the Hunger Moon, just before the first thaw…
Read More
Does the cold weather have you dreaming about fresh greens and colorful salad? Grow and harvest sprouts indoors to make those dreams a reality! Follow this quick start guide to year-round greens for fresh salad greens in just a couple of weeks! The following is an excerpt from Year-Round Indoor Salad Gardening by Peter Burke. It…
Read More