Growing your own vegetables may be easier than you think! All you need is an indoor or outdoor space & some seeds, and you’ll be starting plants in no time.
The following is an excerpt from Fresh Food from Small Spaces by R. J. Ruppenthal. It has been adapted for the web.
Starting Plants from Seed
Once you’ve picked your location, the next step in preparation should be to find out the last average frost date for your location. This is the approximate, but very crucial date that is referred to on the back of many seed packets (for example, “Set plants out three weeks after last average frost date”).
To find your last average frost date, check online or with your local nursery or agricultural extension agent. An online chart is available for major cities from the Farmer’s Almanachere.
One warning: Microclimates vary significantly, and in my area a distance of a few miles can extend the frost date by a month.
Keep an eye on the temperatures where you live and how much they vary from the closest point listed on those charts. The charts also show the first average frost date in the fall, which is good to remember when planning the length of your main growing season.
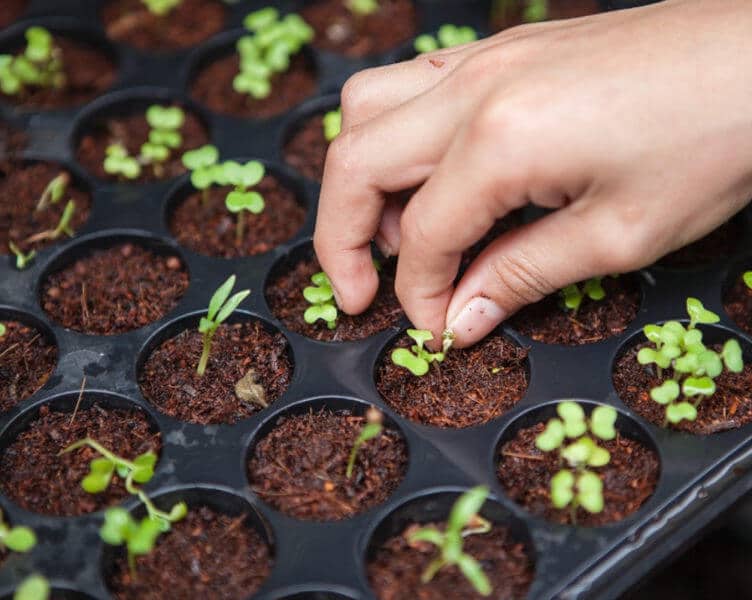
Step 1: Start Seeds in Containers
You will need some containers to start your seeds in.
Think of the small seed-starting trays that seedlings come in when you buy them at a nursery; you can either purchase some of these seedling trays, or you can use any other small containers that can be filled with 2 or more inches of seed-starting medium.
Small yogurt containers or cutout milk cartons are effective, and you can start a dozen small seedlings in a cardboard egg carton.
You also can reuse plastic pots, even larger ones, and plant as many seeds as you can fit in the space.
(Do not pack them in too tightly, though, since root growth is important and you will need to get them out without destroying the root system.)
Punch a few holes in the bottom of any plastic containers you use to allow for proper drainage, as too much moisture buildup will kill seedlings. Another option is to use peat or coconut (coir) fiber pots, which can be placed right into the garden soil, alleviating some of the stress of transplanting.
Maximize Your Chances of Success
For planting times, follow the recommendations on the back of your seed packets coupled with what you have learned about your last frost date.
To maximize your chances of success, you can try two or three plantings of the same seeds, each spaced a week or two apart. This way, when your first pepper plants are ready to go in the ground, your next set is only two weeks behind.
If it turns out there is a late frost and your first wave of peppers dies, then you have a backup set that’s ready to go.
Using this method, you can save time and also challenge the seasons with a little more confidence: If you don’t stand to lose everything by planting your seedlings early, then you can take some chances on a very early planting.
Seed-Starting Mediums
Put some seed-starting medium into the containers. This can be garden soil, as long as it has enough organic matter to be fairly light, but it should be sifted so that any large pieces of material are kept out.
Sifted peat makes a good starter medium and you can also buy good seed starting potting soil from nurseries (overpriced, but one bag will last you a while).
I always mix in a spoonful of compost or worm castings when I start seeds; you do not want to burn young plants with fertilizer, but these amendments are slow to release nutrients and they help strengthen the young plant’s immune system.
Another option is to use the seed-starting blocks or pellets that are sold by some seed companies and in nurseries.
For anyone using peat products to start seeds indoors, I have two pieces of advice:
Some people believe that peat moss is harvested in a manner that is both unsustainable and environmentally irresponsible. If, after examining this issue, you agree, then look for a nursery or online retailer that sells the coconut (coir) fiber alternative, which works just as well and is sustainably harvested. Another company has introduced seed-starting pots made from composted cow manure, which is certainly a renewable resource, and if you cannot find these locally, then check out Cowpots.com.
Peat pots and growing disks often are contaminated with the eggs of root maggots. This can be a big problem if you are growing seedlings in your own home, because you will get little worms eating your seedlings’ roots and a cloud of fruit fly-like insects within a few weeks of planting. To sterilize the peat medium before using it, either drench it in a 50/50 solution of water and hydrogen peroxide (give it a day or so to evaporate before planting) or nuke your wet peat products in the microwave for two minutes on high, which also should kill everything. (Keep an eye on it so you don’t start a fire since cooking times may vary, and make sure your significant other is not home at the time because your kitchen will smell very earthy.)
Plant the seeds according to the directions on each seed packet.
Do not bother planting beans and peas; they do not transplant well and are better sown directly in the garden. You can plant two or three seeds per container or block and then thin the plants later, or you can take your chances and just plant one.
Early in the season, even indoors, seeds will benefit from some heat and humidity for germination.
Putting a plastic bag over the containers is one good way to make this happen. A clear plastic food tray also makes a good cover.
Bottom heat speeds up the process and makes it possible to start seeds earlier; you can get a heating pad for seedlings from a nursery or place them on a warm surface such as the top of your refrigerator.
As soon as the seedlings start to emerge, take the bag off and start giving them a little light. If you have a sunny window, put them there with a little protection. (A curtain, napkin, or plastic bag well-placed will allow some diffuse sunlight that will not burn young plants.)
If you’re using a light, your fluorescent or CFL bulb should be on for 12 hours per day (more is okay also), and this should be a few inches from the tops of the seedlings so that they get enough concentrated light.
Water the seedlings gently, either from the top of the soil or by placing the seedling containers in a tray of water until their soil seems moist. Make sure they are draining well, and do not overwater; this is a major cause of seedling failure.
Pick only the strongest (bushiest) plants and thin out the spindly and slower-growing ones.
Many people suggest that, when the seedlings are up and growing, you run your hands over the leaves whenever you go by to mimic the wind and stimulate the plants to grow stronger in response. A week or so before you plant your seedlings in their final earthly destination, they need to be “hardened off.”
This is a step that people too often neglect, and it basically means allowing the plant to slowly adjust to the temperature and climate of its new home.
You do this by putting the seedlings outside for a short time each day and gradually lengthening this time period. Do not put them in a bright sunny or windy area at first.
On the first day, put them outside in filtered sunlight for half an hour. The second day, leave them out for an hour.
The third day, leave them out for two hours. Then half a day, then a whole day, bringing them in at night. If they are destined for a windy location, you can begin giving them a little of their customary wind, protected at first if need be.
Wind actually can help make a seedling stronger and more vigorous, but only in small doses.
After a week of this, let the plant stay out for a whole day and night in its new location, and then plant it the next day.
For a peat or coco pot, place it directly in the soil; for other potted seedlings, wet down both the pot’s and destination’s soil first, then slowly take out the plant with its soil, and be sure not to damage the stem or leaves as you transfer it to its planting hole.
If the night temperatures are still near freezing when you set out your plants, then cover each of them at night with a plastic yogurt container, milk carton, or soda bottle that is cut in half: These can make inexpensive season extenders if they help you get your plants in the ground earlier.
But when in doubt, do not risk that your plants will freeze: Wait just a little longer to set them out until the frost danger has passed (unless, of course, you have another set of seedlings ready for backup purposes).
Before I plant warmer-weather veggies, I always look at the weather report and make sure that their first week in the ground will be a warm one; this helps them get off to a strong start.
If you manage the “hardening off” well and allow the young plant to adapt slowly to its new conditions, then it will produce food for you more quickly than a direct-seeded plant. Using transplants also can allow more growing time for your last cycled crop.
But if the plant becomes stressed during transplanting, its yield will drop and it may not survive at all, which negates any time saved from starting it indoors.
Raised garden beds are a great way to utilize small space to create a bountiful garden. Discover how to create beautiful, easy-to-maintain raised garden beds!
Do you have an old, worn-out pair of jeans in your dresser? Instead of throwing them out, try to grow mushrooms on them. Follow these guidelines to get started.
Hot sauce fans, this one’s for you! This easy recipe for fermented hot sauce with wild greens is sure to add an extra punch of flavor to your favorite meal.