

Say (Vegan) Cheese! Making Spicy Hard Cheese

For the next post in our vegan cheese series we’re trying our hand at spicy hard cheeses! While the base and first few steps of this recipe are very similar to the vegan cheese spread in the last post, there are few extra steps that’ll test your fermentation and cheese-making skills. If this sounds a bit complicated, don’t fret! We’ve included step-by-step images to help guide your way.
The following is an excerpt from Wildcrafted Fermentation by Pascal Baudar. It has been adapted for the web.
(All Photography curtesy of Pascal Baudar unless otherwise noted.)
Let’s make some spicy hard cheeses. This recipe is really the foundation for many others; using the same method you can substitute curry for the chili/ paprika powder; add a dried herb mix such as Herbes de Provence, Italian Herbs, or you own “wild” blend; and so on.
Ingredients
Here are the basic ingredients to start with. We’ll add more spices and savory elements later during the process.
2 cups or 11 ounces (312 g) cashews (before soaking)
Around 1⁄2 cup (118 ml) Culture Starter; you may need a bit more (for my spicy cheese, I used some Fermented Wild Mustard Roots brine)
2 tablespoons (12 g) garlic powder
4–5 tablespoons (16–20 g) nutritional yeast
1 teaspoon (6 g) miso (optional)
1 teaspoon (4 g) spicy chili powder or flakes
2 tablespoons (13 g) smoked paprika
1⁄2 teaspoon (3 g) salt
Note that you have a lot of freedom with these ingredients. You can use less paprika or replace it with mild chili powder. If you want to make a curry cheese, replace the chili powder and paprika with around 2 teaspoons (4 g) of Curry Blend.
Procedure
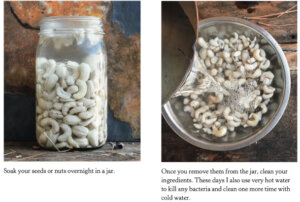
- Soak your cashews overnight (at least 8 hours). Afterward, rinse the cashews with cold water once and then soak them in very hot water for a couple of minutes. The idea is to kill any unwanted bacteria. Rinse once more with cold water, then drain the cashews and transfer to a high-powered blender such as a Vitamix.
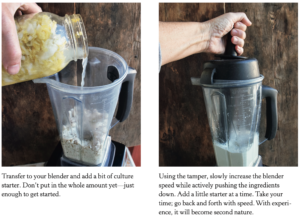
- To make the paste, you’ll need to use the blender tamper and push the ingredients down from time to time. I pour in 1⁄4 cup (59 ml) of my starter (active sauerkraut brine or spicy brine) and start the blender on low, slowly increasing the speed while I actively push the ingredients down with the tamper. If the blades stop mixing the contents, add a bit more fermenting brine or starter. Your goal is to try to keep the starter to 1⁄2 cup (118 ml), but you may need more than that. If so, don’t worry—but do try not to use too much. The goal is to blend at high speed for a minimum of 10 seconds until very smooth. If you prefer a cheese with some texture in it, however, you can stop blending whenever you like it.
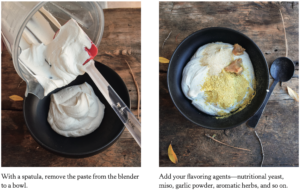
- Next, using a spatula I remove the contents to a bowl and add the remaining ingredients. Taste the paste and add more salt if necessary; you want it to be a tad too salty.
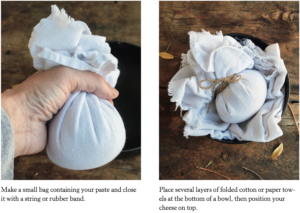
- To make a hard cheese, you’ll need to remove as much moisture/liquid as possible. Place the paste into a folded towel (two layers) and tie up the top. Regular cheesecloth doesn’t work very well; you want the fibers and weaving to be tight enough that your paste won’t go through. I use thin cotton towels that can be cleaned later on. My favorite brand is First Street White Flour Sack Towels, which can be purchased in the United States at stores such as Smart & Final. Flour sack towels can also be bought online.

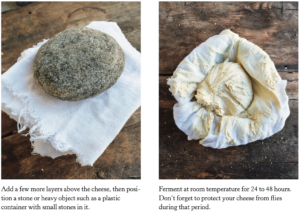
- Place a few layers of folded cotton or paper towels at the bottom of a bowl, then position the cheese on top. I use as many as eight layers. Add a few more layers on top, then position a stone or heavy object such as a plastic container with small stones in it. The weight will squeeze out any excess moisture, which will soak into the layers of cloth/paper towels above and below your cheese. Feel free to research different techniques, but this one works extremely well. With experience, you’ll even be able to judge how many layers you need based on the liquidity of your paste; so far I’ve never had an issue with too many layers. You can also check the paper towels and replace them with some new ones if they’re soaked.
- Place the bowl inside a closed plastic or paper grocery bag or cover it with a large bowl set upside down.
- I ferment my cheese at room temperature for around 24 hours. In a colder climate, 48 hours may be more appropriate. You can judge by smell: If it’s fermenting well, you’ll smell a beautiful tangy, sour, and cheesy scent when you open the bag.
- When you’re ready, remove the stone and cloth layers and open the towel wrapped around the paste. The inside should look like a solid cream cheese and separate from the towel easily.
- Place the paste into a new bowl and taste. Does it need more salt? More flavorings? This is your opportunity to be creative. If you want to make a spicy cheese, you can add some chili flakes and smoked paprika. You can also add dried herbs for an herb cheese or Curry Blend to make an Indian cheese.
- For this spicy cheese, I added the following:
- 1⁄4 teaspoon (1.5 ml) liquid smoke (optional)
- 1 tablespoon (6 g) garlic powder
- 2 tablespoons (8 g) nutritional yeast
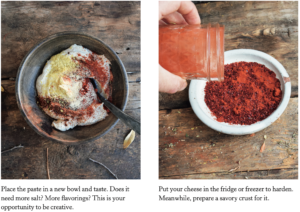
- Once you’ve added your ingredients/spices and stirred everything into the paste, place the bowl in the refrigerator or even the freezer to harden a bit. It’s important because the next step will be to shape it by hand. Five to 10 minutes in the freezer is usually enough—you don’t want to freeze it. Around 30 minutes in the refrigerator should be plenty.
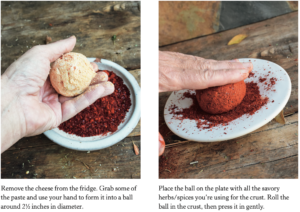
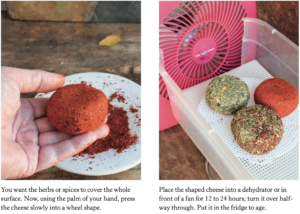
- Remove the paste from the fridge, grab some of it, and use your hands to make a ball from 2 to 2 1⁄2 inches (5–6.3 cm) in diameter. Place the ball on the plate with all the savory herbs/spices you’re using for the crust. Clean and dry your hands, then roll the cheese ball back and forth on the plate. You want the herbs or spices to cover the whole surface. Then, using the palm of your hand, press the cheese slowly into a wheel shape.
- In this recipe, I made the crust with mild chili flakes (Korean chili flakes) and smoked paprika. Place the shaped cheese into a dehydrator or in front of a fan, but make sure it’s protected from flies and other critters (see the photo of my setup on page 253). Dehydrate at room temperature for 12 to 24 hours, turning the cheese halfway through. In summer, when it’s hot and dry, I may dehydrate my cheeses for less time—say, 10 to 12 hours. You just want a dry crust around your cheese. If it takes only 10 hours, that’s fine.
- Remove the cheese and store it in the fridge. Modern refrigerators will continue the dehydration process and slow down the fermentation. You can age your cheese up to 10 days; it should be hard enough to eat after 3 or 4 days, though. My favorite aging time is around 6 days. I think the flavor and texture are at their best then, but that’s just my opinion.
During the whole process, cleanliness is very important. Use clean and fresh towels, no dirty hands, and wash any instruments you’ll use such as spatulas, spoons, blender, bowls, and so on. Hot water and soap are all you need.
I’ve never had an issue with mold but if it occurs, toss everything and start again from scratch. Don’t take risks with your health.
Recommended Reads
Read The Book
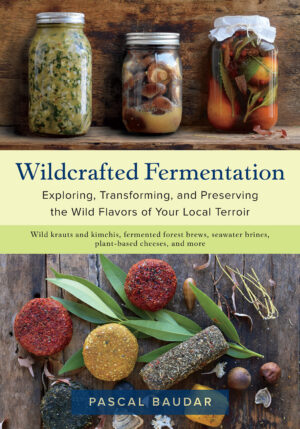
Wildcrafted Fermentation
Exploring, Transforming, and Preserving the Wild Flavors of Your Local Terroir
$14.97
You may like...
-
 $6.24
$6.24 -
 $4.49
$4.49 -
 $17.48
Recent Articles
Oh, honeysuckle…how we love thee. If only there was a way to capture the sweet essence of this plant so we could enjoy it more than just in passing. Luckily, foraging and some preparation can help make that happen! Here’s a springtime recipe that tastes exactly like honeysuckle smells. The following excerpt is from Forage,…
Read More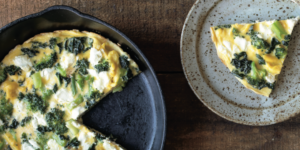
Introducing…your new favorite brunch dish! This whole broccoli frittata is packed with fresh, wildcrafted flavors that are bound to help you start your day off on the right foot. The following is an excerpt from The Forager Chef’s Book of Flora by Alan Bergo. It has been adapted for the web. RECIPE: Whole Broccoli Frittata…
Read More
Wondering where to forage for greens this spring? Look no further than hedges, which serve as natural havens for wild greens and herbs! The following is an excerpt from Hedgelands by Christopher Hart. It has been adapted for the web. Food from Hedges: Salads and Greens Let’s start by looking at all the wild foods…
Read More
There’s a whole new world out there when it comes to koji. It doesn’t matter if you’re making bread, cheese, or ice cream, koji helps you pump up the flavor! Growing Koji in Your Own Kitchen Koji, the microbe behind the delicious, umami flavors of soy sauce, miso, fermented bean sauce, and so many of…
Read More
Whether you’re looking to replace your end-of-the-day cocktail, relax before bed, or want something new to add to your tea, this non-alcoholic mocktail syrup base will do the trick. Delicious and all-natural, take a sip of this nightcap mocktail and feel your troubles melt away. The following is an excerpt from Herbal Formularies for Health…
Read More